Routine Care
How the Pad Works
Before I talk about the problems and solutions I feel it is necessary to give you a simplified explanation of how the DDR pad works. The basic components of the DDR pad are the underlining wiring, the contact plates, and the Plexiglas and metal buttons.
Basically you can conceptualize the pad itself as an oversized controller. The player moves by stepping on the different buttons and these are transferred by the controller into electrical impulses that the console can understand. The entire pad itself is comprised of several electric circuits with the buttons acting as switches. Since electric flows from positive to negative over a given conductive path, the path must be completed for an action to be registered, such as a button press from the player.
Wires are run from the console to contact plates underneath each of the buttons. These contact plates are arranged in an interweaving parallel, but unconnected pattern. By default these plates are not connected and do not complete the electrical circuit to register a button press. The plexi-glass tiles, buttons, that hover above these contact plates are coated with a conductive layer of tape on their undersides (The metal buttons on the corners do not have this because their surface is metallic). These tiles are suspended above the metal contact plates by a thin layer of insulation that elevated the outer edges of the tile.
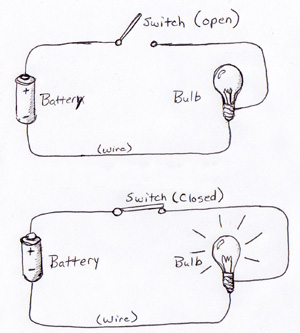
Here is a diagram of a basic electrical circuit. Eletric flows from the positive battery terminal across a complete path toward the negative terminal.
In the top example the builb will not light because the switch is open, shorting the circuit. In the bottom example the bulb will light because the switch is closed and the circuit is completed.
These are analygous to the functions of a DDR pad where the arrow tile and conductive plates form the switch.
When the player steps on an arrow the tile is depressed pushing the elastic insulation down and allowing the metallic tape surface to provide a contact point connecting the two contact plates. This effectively completes the circuit and registers as a pressed button sending a signal to the console. When the player moves off of the tile, the insulation elevates the tile to its initial position and the circuit is broken again.
That is the premise in a nutshell, so let's continue on with fixing problems that can occur.
Routine Adjustments
When you own a metal DDR pad you will have to perform some routine maintenance from time to time. This goes without saying because of the amount of strain the pad will undergo having someone jump and trounce around on it. These necessary adjustments will usually present themselves as problems during the game play and you will need to take the time to correct them. You can even make these adjustments while the game and console are still powered on and the procedure will only take a couple of minutes to perform once you get used to it.
Loose Screws
One of the most common issues will be the four screws around the central tiles will become loose. These screws hold the arrows in place. What I advise is to keep a small flathead or Phillips head screw driver near your console for when this occurs. All you have to do is simply tighten the screws back down as they become loose. Depending on how much you use your DDR Pad you might find yourself doing this once every two to three weeks.
Dirty Contact Plates
Another common duty that you will have to perform is to keep the contact plates clean underneath the arrow tiles. I guess you could do this every month or so, but I prefer to wait until game play is affected by an arrow sticking or being non-responsive. As a general rule this will happen less frequently than the screws becoming loose and you will find yourself having to clean the contact plates every month or two.
The contact plates are easy to clean. First you must remove the screws holding the arrow in place. Usually there are two of these and they will be located near the center of the pad. Once the screws and washers are removed you will be able to life up one side of the arrow. As you gently remove the arrow from it place you will need to pull it to the center in order to clear the lip of the outer metal frame. If your arrow has led lights attached to it take extra care not to place too much stress on the wires.
Once the arrow has been moved from it compartment you will be able to see the metal contact plates. Take a rag with some isopropyl alcohol on it and wipe away the debris from the contact plates. You might need to utilize the surface area of a flat head screw driver to gently remove any stubborn metal fragments that have accumulated between the tracks of the contact plates. Next use the rag to wipe off the underside of the arrow tile.
Now that the tile and contact plates have been cleaned place the arrow back into its compartment by sliding the tile under the lip of the metal pad frame and letting the rest of the arrow fall into place. Re-attach the washers and screws being careful not to over tighten or strip the screws themselves.
Final Thoughts
Even though these metal DDR pads require a small amount of routine maintenance and are considerably more costly than their foam pad alternatives they are indeed the best choice for serious players. These will outlast the foams pads and are more resistant to sliding around on the floor. If a part on the pad goes back you can simply buy and exchange that part verses buying a whole new pad. I strongly recommend purchasing a couple extra arrow tiles when you buy your DDR pad because these will begin to wear after a year if you play it continuously.